June 25, 2018 visual regression testing testing jest mocha puppeteer docker phantomcss muppeteer jest-image-snapshot resemblejs pixelmatch huddle
TL;DR: Visual Regression Testing captures regressions in CSS in an automated way, using screenshot image comparisons. You should use Docker to avoid environmental differences, and jest-puppeteer-docker with jest-image-snapshot are the perfect tools for achieving this.
🎬 Introduction
Automation tests are usually concerned with the functional requirements of an application. This post will show you why this might not be enough to have peace of mind when deploying your web app UI projects to production.
Does the UI look right? 🤔
- You can test that particular DOM elements exist on the page when certain criteria are met, such as clicking a button and performing an action.
- You also might test that the router is correctly initializing the right page or component when a particular end-point is hit.
Question: How do you test if the application actually looks right?
Answer: One way is to manually look. We’re usually quite good at spotting large regressions, such as colour changes or content overflowing on the page.
👎 Problems:
- The application is large. There may be many different screens, and some will show under very specific, rare conditions (e.g. permission based)
- What if the application is responsive, and one needs to test multiple breakpoints for different devices and screen sizes?
- What if the tester simply misses something? They could miss both small and larger regressions, due to Change Blindness.
- Time is a factor too. With all these different scenarios, it might simply be too time consuming for developers and QA to do a thorough job.
An automated mechanism for testing how the UI looks is needed. What if you could take a photo of the UI component before and after a breakage and compare the difference in a computery kind of way? (Puts nerd hat on)
🎨 Pixel Comparisons
Every image is made up of pixels, which are assigned a red, green and blue value. In a simple model, you could take screenshots of the UI and compare every pixel’s colour in screenshot one with the pixel colour in the corresponding location of screenshot two. If any pixels are different, then you know the images are not identical.
Maybe a single pixel difference is quite a high threshold, so let’s say that there’s probably a problem if 1% or more of pixels are different.
It’s not quite as simple as that. There are other factors that might give false negatives. Aliasing occurs when an image’s resolution is too low for the processor to accurately render smooth lines. You end up with jagged edges, often in text. Operating systems will apply anti-aliasing techniques to give a smoother appearance, but they all do it slightly differently.
Problem: You can get different comparison results per environment.
Image comparison libraries can deal with anti-aliasing problems by ignoring some of the pixels where anti-aliasing is likely to have occurred. Examples of libraries include ResembleJS and Pixelmatch.
Visual Regression Testing Process
❶ Take screenshot of the UI in good state
The visual regression library or framework of your choice will provide a function to do a visual comparison. When it’s invoked on a particular UI element, a screenshot is taken of it. If one doesn’t already exist, the test will automatically pass and output the screenshot to disk.
❷ Store the screenshot in source control
After running the tests, you version the test suite and associated screenshot in source control, e.g. Git. This will become the baseline image.
❸ Run the tests again after a code change
After making a code change, the test suite can be run again. Code changes, once committed, can also trigger tests configured in a CI environment. The visual regression library or framework will see that a baseline exists and will take a second screenshot of the UI element. It will be held in memory instead of on disk.
❹ Compares screenshots
The new screenshot is automatically compared with the baseline image to see if there are any visual differences.
❺ Pass or fail test based on visual threshold
The test will be sent a pass or fail signal depending on how different the screenshot is. This is based on the threshold configured.
❻ (Optional) Rebase visual if valid change
If the visual test has failed due to a intended change, you can rebase the visual so that subsequent test runs will pass. This is essentially done by removing the old image and running the test again to generate a new baseline to be committed.
👍 Benefits
Say you have a Panel component which displays a title and a body. You use it in a few places and release it to production.
You later decide to add an icon to the panel in one mode, so you give it a property to enable the icon. You conditionally put the icon next to the title if it exists. You’re happy with how that looks and you integrate it into your page.
You later find out from a customer that the panel is misaligned.
What happened?
Well, when you added the icon next to the title, you added a margin. But what you didn’t realise is that you applied the margin to the title element, which is not scoped to the new property. Now there’s a margin in both modes!
⌨️ Large refactors
You may be doing a large scale architectural refactor. For example, you have a CSS file that you need to split up.
In CSS, the order of imports is important for specificity. So if you get the wrong order, your application could look different. Sometimes this will be quite obvious, but perhaps not. You might subtly break your hover states.
🖍 Theming
You might provide theming capabilities to your application, where you set theme styles for each customer. It’s not ideal to test the whole application again for every single theme because functionally it will work the same. Instead, you can just use visual comparisons to ensure styles are correct.
✋ Limitations and solutions
If you decide to take screenshots of dynamic content, you’re in for some trouble. Taking multiple screenshots of the BBC News website even within a 5 minute window could yield different results. It’s important to remember to stub dynamic content within the system under test.
🚀 Animations
This is just an image ^
Animations are a lovely enhancement to your application, but they can play havoc with visual regression testing. Imagine a spinner component. If you take a screenshot of it twice, there’s a fair chance that the visual will be different. Animation speeds can vary by milliseconds, so you might get a screenshot of the spinner at its starting position in one case and the middle position in the second case.
The solution here is to disable animations in your tests.
🖱Browsers
People use different browsers, so you should be testing that the UI looks right in a handful of them. Visual regression testing isn’t really about checking cross browser rendering. It’s designed to look at regressions, and you usually find most dev regressions in one particular browser. It’s an expensive job to run all your tests against every browser, so it’s usually sufficient enough to manually smoke test or use something like BrowserStack.
💻 Operating systems
Operating systems will render content differently. If you look at your app in Windows and compare it to MacOS, it will likely look different. This is a problem for visual regression testing where you have teams on different environments. It’s important to make sure that screenshots are taken under the same environmental conditions every time, otherwise it defeats to purpose of automation testing.
📦 Docker
Docker allows you to host a different environment within the current OS. It’s like a virtual machine, but it works a little differently. The important part here is that you declaratively provide a recipe for how the environment should be configured, and it’s followed every single time a container is started.
🛠 Libraries and frameworks
Let’s now take a look at some of the visual regression solutions available.
PhantomCSS
PhantomCSS was one of the first open source front-end visual regression testing libraries around. It was released by James Cryer at Huddle back in 2013 and has become quite a popular tool.
It uses PhantomJS, a headless browser (no GUI), to render web applications. On top of that, CasperJS provides a comprehensive API for interacting with the browser and the DOM. For example, you can click on buttons, navigate to pages, get and set properties on page elements, etc. James also created the image comparison library, ResembleJS, to compare the screenshots.
The main problem is that PhantomJS is no longer being maintained as a project. It’s based on an old fork of Webkit, which lacks support for modern browser features, such as CSS Grid. It’s possible to use SlimerJS instead, which is based on Gecko, the rendering engine behind FireFox. However, the technology for communicating with the browser is not standardized.
First Solution: Muppeteer
Due to the problems with PhantomJS, a newer solution is needed. Originally, I was writing a lower level library to work with the Chrome Debugging Protocol, but Google released Puppeteer, which did exactly what I was trying to do.
Puppeteer allows you to interact with the browser and pages in same way CasperJS does with PhantomJS. The difference is you get a lot more control, and a standardized protocol is used.
I decided to write a framework called Muppeteer, for running Mocha tests with Chrome via Puppeteer, and allow for visual testing using Docker. The image comparison library used is Pixelmatch, a lighter version of ResembleJS.
One of the benefits of the framework is the abstractions for test setup. In Muppeteer, many of the abstractions occur using a wrapper describeComponent block. You can configure the URL to navigate to here, or you can do that in a more central place, like in the example below.
The important part is the assert.visual() function. This is what performs the visual comparison. All you provide is a DOM selector for the component you want to take a screenshot of and the framework will do the rest.
describeComponent({ name: 'Panel' }, () => {
    describe('Simple mode', async () => {
        it('should have a title and body', async () => {
            ... omitted functional tests ...
        });
        it('should position the title and body correctly', async () => {
            await assert.visual(panelContainer);
        });
    });
    describe('Icon mode', async () => {
        it('should have a title, body and icon', async () => {
           ... omitted functional tests ...
        });
        it('should position the title, body and icon correctly', async () => {
            await assert.visual(panelContainer);
        });
    });
});
To configure your test suites, you just have to invoke a configuration function in a Node script as your entry point for running the tests.
const ConfigureLauncher = require('muppeteer');

const launcher = await ConfigureLauncher({
        testPathPattern: 'tests/**/*.test.js`
        reportDir: 'tests/report',
        componentTestUrlFactory:
            ({name}) => `http://${IP}:${PORT}/${name}`,
        visualThreshold: 0.05,
        useDocker: true,
        dockerChromeVersion: '67.0.3396.79',
        onFinish: () => {}
    }
);

await launcher.launch();
You can configure a function that returns a URL to navigate the page for all tests, based on arguments passed to describeComponent in your test. You can alternatively manually navigate within the test itself.
The other interesting configuration is setting up Docker. Normally, you’d have to create a Dockerfile for creating all the dependencies for the image. With Muppeteer, the only dependency you have is having it installed on the computer. By setting the dockerChromeVersion property, when you run the tests, Muppeteer will automatically pull a Docker image with that version of Chrome installed. The test runner will then start a container and run the tests against the Chrome instance running inside.
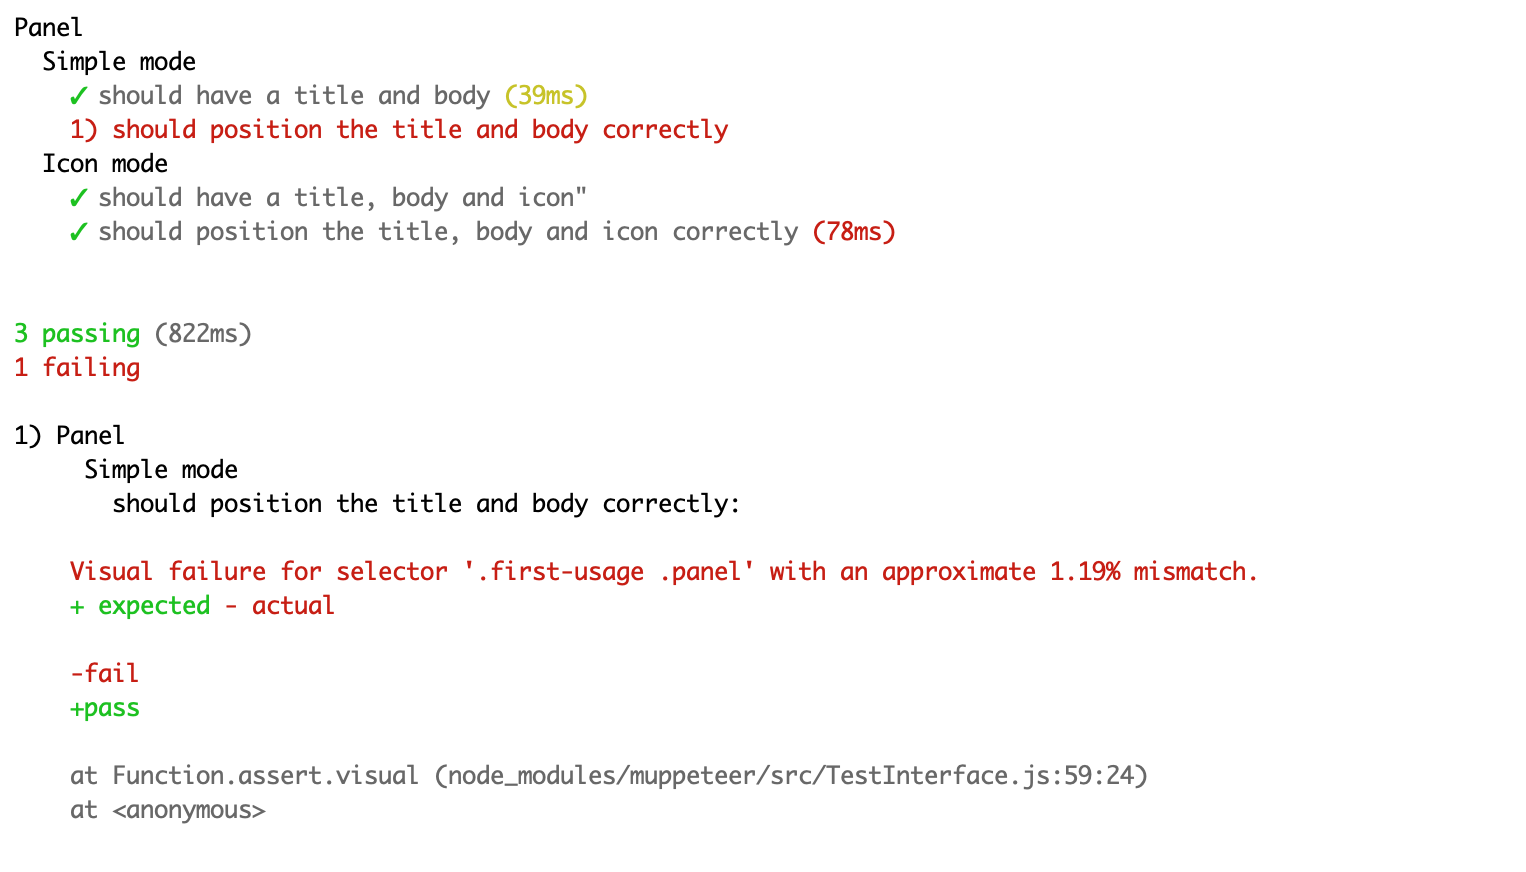
When running your test suites, you will see a percentage mismatch in the terminal when a test fails. You can then go to the screenshot path to view the differences.
You can take a look at muppeteer-example for an example repository including both a unit test and an end-to-end test suite.
🎉 Jest Puppeteer Docker with Jest Image Snapshot
While I was creating Muppeteer, American Express were also working on a Jest plugin called jest-image-snapshot. The main difference is that it’s not a full framework, it’s a just a plugin library. The extensibility of Jest is great.
Originally, it was quite cumbersome to configure and setup Puppeteer with Jest via their interface hooks. However, with improved configuration options in new versions, the developers at Smooth Code created jest-puppeteer.
Jest Puppeteer is a brilliant library that launches Chromium and runs your Jest tests against it, rather than the standard Node environment. You can then bring in jest-image-snapshot and configure your visual tests really easily.
The problem here for Visual Regression Testing is that the Chromium instance doesn’t run in a Docker container, which may cause some of the environmental problems I outlined earlier in this post.
I solved this by publishing jest-puppeteer-docker, a plugin that wraps Jest Puppeteer, but instead, launches Chromium in a Docker container. It works by looking up the version of Chromium linked to the Puppeteer dependency in your project, and then pulls a Docker image containing that version of Chromium. Tests will run against that version.
describe('Panel tests', async () => {
    beforeAll(async () => {
        await runSetup();
    });

    describe('Simple mode', async () => {
        it('should have a title and body', async () => {
            ... omitted functional tests ...
        });

        it('should position the title and body correctly', async () => {
            await visualCheck(panelContainer);
        });
    });

    describe('Icon mode', () => {
        it('should have a title, body and icon', async () => {
            ... omitted functional tests ...
        });

        it('should position the title, body and icon correctly', async () => {
            await visualCheck(panelContainer);
        });
    });
});
Much like Muppeteer, Jest provides hooks for you to put functions and other state on the global object before the test runs. In the case above, I was able to hide the configuration for jest-image-snapshot and the URL for the page.
You can take a look at an example config and test, which includes reporting.
This is my recommended solution now, as it’s more flexible than the lockin associated with frameworks like Muppeteer. Jest is also very powerful.
More
There are several other libraries and frameworks available that implement visual regression techniques. Some use more legacy technology, such as PhantomJS, but others use more modern techniques.
Check out awesome-regression-testing for an extensive list.